
Introduction
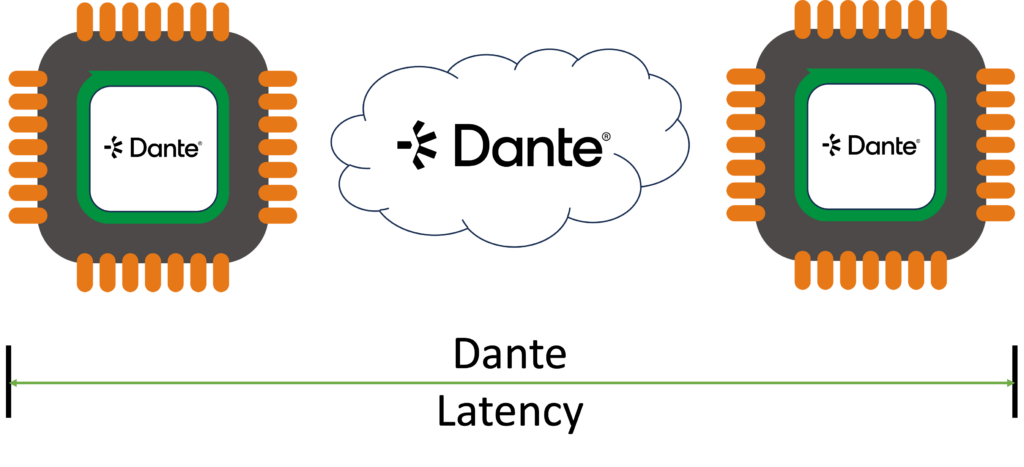
Dante is known and famous for its microseconds latency performance. When you setup a Dante device in the Dante controller there is a latency setting that you must select. How does this all work? Welcome in the back end of your Dante system. Here you find the unknown and not so obvious.
“Let’s get latency.”
In the DAW world latency is mostly written as the time it takes to get a signal through a processor step. This step could be a plugin in the DAW or the soundcard AD converter during a recording session. Latency is easily visible when you record an external drum synth via midi into your DAW. After recording the kick is not on the grid of the DAW but a little bit later. That’s the latency of your recording system.
In Dante we also have a latency when you transmit an audio stream from a transmitter device to a receiver device. This audio stream will flow through a LAN network that connects both units together. This Lan network is built out of switches (and maybe a router). Well, a switch needs to perform some tasks before it can deliver the received data to its destination port.
Switches in a Dante network
The minimum switched network configuration consists of three steps. First step is the switch (Dante port) on the transmitting device, second is the network switch and third is the Dante port on the receiving device.
This chain will generate a total transmission delay between the Dante transmitting and receiving device.
Be aware that the total latency of the hardware unit is not calculated in the Dante latency value. For instance, when you have a Dante DA converter the time that it takes to convert the digital data stream into an analog signal is not shown in the Dante latency value. The Dante system does not know what happens to the data stream ones it leaves the Dante built in board or chipset. In the case of a DA converter the additional delay might be very small (a few samples). But when Dante is built into a digital mixer with a lot of onboard processing going on, the latency value of the Dante connection is most likely the smallest part of the complete signal chain.
The device latency setting
For every device in a Dante network, you must set a device latency value. Depending on built-in Audinate chipset or board the latency can vary from 0.25ms up till 10ms. The more expensive hardware units will have lower values and vise versa. But with every hardware Dante product you can select various values. As an example, the AVIO USB-C adapter will have a selectable latency value of 1ms, 5ms and 10ms. Which leads to the question, which one to choose and why?
The latency value numbers stand for the maximum time the receiver accepts between two data packages. So, if you put the latency value on 1 msec it means that the receiver expects every data package to arrive within one millisecond. If a package will arrive later than 1msec, you will get audio dropouts.
Back to the configuration question. When you set the latency value of a device in Dante controller think about the maximum path that the data can travel to this Dante device. How many switch hops will it contain? Only 3? Then select the lowest value to start with. Are there much more switching hops then select a higher value. As a rule of thumb every switch hop adds 0.1msec latency.
The software only product Dante Via from Audinate will have latency value of 10ms. The reason for this is simple. A computer needs time to process and deliver data to the Dante network. This delivery process cannot be managed by Dante and is let’s say dynamic and unpredictable. It depends on other tasks the computer is doing as well. To be on the safe side a minimum value of 10ms is used.
The latency of a single Dante subscription
When two Dante units are subscribed to each other one will be the transmitter and the other one the receiver. There is a connection setup step at the start. During this initial step the transmitter and receiver define the latency value for this subscription based on their latency settings. The unit with the highest latency value will be used for the subscription between both. See the example below.
The latency of multiple Dante subscriptions
Dante devices can have multiple channels (up to 512 if you like). How does this go from a latency point of view?
Well, a Dante device is capable of handling multiple latency values at the same time. Every subscription to the receiver has its own latency setting.
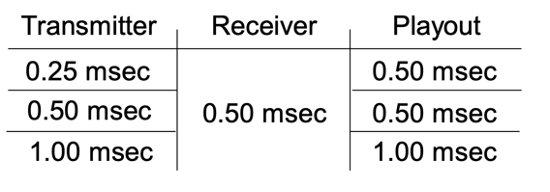
As an example, we have a four channel Tascam Dante DA converter with its latency set to 0.5msec. On channel 1 and 2 the Tascam receives a stereo signal from an AVIO USB transmitter with a latency setting of 1 msec. Then the channel 1 and 2 subscription will have a latency of 1msec.
At the same time on channel 3 and 4 of the Tascam we have a subscription with the RME Digiface Dante transmitter. The RME has a latency setting of 0.25msec. The subscription for channels 3 and 4 will have a latency of 0.5msec.
Latency performance
Within the Dante Controller you can readout the actual latency value of a subscription at the receiver side. And here some confusion might start.
Go to “Device View” in the Dante Controller and select the tab “latency”. You will get a similar screen like below if the Dante device receives audio streams. The view shows the latency performance per subscription (in this picture we have three subscriptions running with different latency settings).
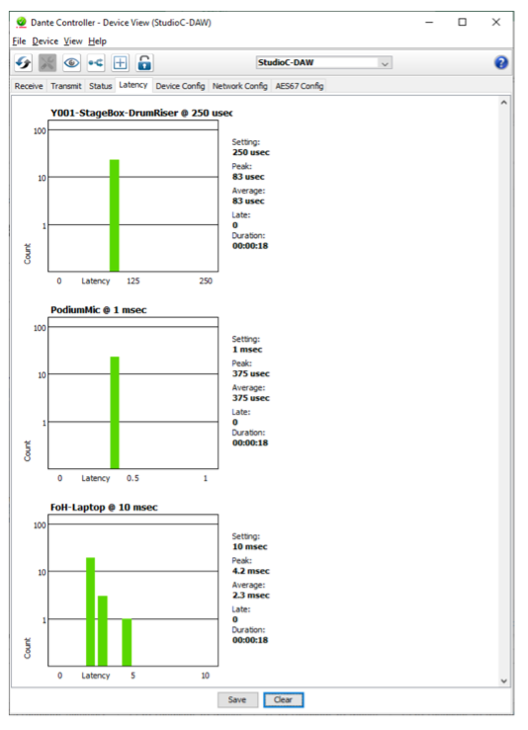
On this screen the measured latency of a subscription is show by its average and peak value. You can also see if any data packages were arriving too late at the receiver.
A common misconception is that the latency performance values equal to the latency of that connection. This is not correct. The latency of the subscription is defined by the value that is determent during the setup of the subscription. What you readout on the screen is how the latency performs on the network. If the values are lower than the setting you are good to go.
On the other hand, what you could do with this performance information is optimize the latency setting of the receiver.
In the previous example the Tascam DA converter was set to 0.5msec and the RME transmitter for channel 3 and 4 at 0.25msec. If the latency performance tab would show a performance value of 120 microseconds between the two you could decide changing the latency setting of the Tascam DA converter from 0.5msec to 0.25msec. Resulting in a latency of 0.25msec between the RME Digiface Dante and the Tascam on channels 3 and 4.
Conclusion
- Shown latency values in the Dante Controller are set between the Dante components in the chain and not the total latency between the input and output of the connected hardware devices.
- The latency between 2 Dante devices is based on the setting that is entered in the Dante Controller in the “Device Config” tab during installation of the Dante unit.
- If the transmitter and receiver have different latency values set in the Device config tab, the highest of the two is used for the subscription between both units.
- A Dante receiver will set for every subscription (or connection of you like) a latency value. These can be different from each other.
- The ‘latency” tab in the “Device View” of the Dante controller tells you how the latency is performing for that subscription. If the latency performance is able to stay below the latency device settings audio dropouts will not appear.
Become a member and leave a comment at our Facebook Group All4Dante
Click here: All4Dante
About All4Dante
All4Dante is an independent platform for Dante equipment and networks. We perform tests and reviews of equipment in our own Dante lab and share the results on our platform. We see a future for Dante in the recording and pro-studio environment as well as in the music instrument segment. By addressing audience related topics we want to support the migration to a more AoIP world.

